Posts

Image
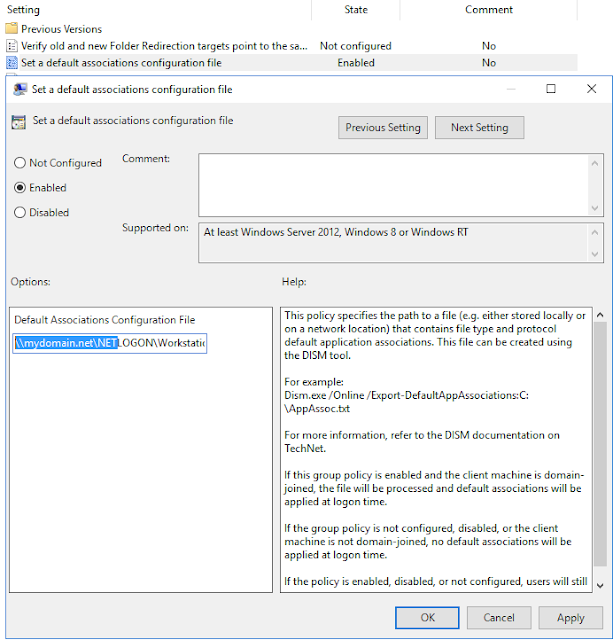
How to set  Adobe Acrobat Pro or Acrobat Reader as the default .pdf application for Windows 10 users? Your organisation might have Acrobat Reader or Acrobat Pro installed. If you make the Acrobat Reader as the default application to open the PDF files all the Acrobat Pro users may need to manually select the application to edit PDF files.  How do we get around to this issue? First, you need to get the Acrobat Reader default application association correct via MS Group Policy then subsequently you could use another policy for Acrobat Pro users based on a WMI query. And, make the Acrobat Pro based GPO precedent over the Acrobat Reader base GPO. What we need  ProgIDs on both Acrobat Pro and  Acrobat Reader Two GPOs created pointing the XML files with ProgIDs as default application policy WMI query ready based on the installed file Note This is a machine-level policy. It is not possible to create user-level policy. Enable the policy, and specify the location where you have sto
Image
Install  Open Broadcaster Software (OBS) 22.0.2  using SCCM Installation of  Open Broadcaster Software (OBS) 22.0.2 Installation Program "OBS-Studio-22.0.2-Full-Installer-x64.exe" /S Uninstall Program  "%ProgramFiles%\obs-studio\uninstall.exe" /S Detection Rule
Image
Denon and Marantz Professional Product Manager 1.0.0 deployment via SCCM  Application packaging Product Manager 1.0.0 Installation Program  msiexec /i "ProductManager.msi" /qn /norestart Uninstall Program  msiexec /qn /x {7DDBB2BC-3E3F-484B-BBAE-1B3C28AF9F5F} Detection Rule 
Image
Install Microsoft Visual C++ Redistributable 2017 using SCCM Scripted  Installation of Redistributable 2017 via SCCM package  Microsoft Visual C++ Redistributable 2017 X64 X86 14.14.26429.4 Install Script (Powershell)  #variables $scriptpath = $MyInvocation.MyCommand.Path -replace $MyInvocation.MyCommand $file1 = "vc_redist.x64.exe" $arguments1 = '/install /passive /quiet /norestart' $file2 = "vc_redist.x86.exe" $arguments2 = '/install /passive /quiet /norestart' Write-Host "Start Install of X64" Start-Process -FilePath $file1 -ArgumentList $arguments1 -Wait Write-Host "Start Install of X86" Start-Process -FilePath $file2 -ArgumentList $arguments2 -Wait Uninstall Script (Powershell)  #variables $scriptpath = $MyInvocation.MyCommand.Path -replace $MyInvocation.MyCommand $file1 = "vc_redist.x64.exe" $arguments1 = '/uninstall /passive /quiet /norestart
Image
Install thankQ Client using SCCM Scripted  Installation of iTunes via SCCM package  thankQ Client  4.40.1309 ThankQ you client installled to C:\Program Files (x86) and C:\ProgramData\thankQ However, the files installed to Program data, thankQ folder required full control access to all users. The below script create a folder on C:\ProgramData call thankQ and assign with full controll so the application will not have permission to run the application from standard user account from a PC. The install also specified the database and server information as install commands .  Install script (Powershell)  Write-Output "Add Folder thankQ" New-Item -ItemType Directory -Path C:\ProgramData\thankQ -Force:$true | Out-Null $acl = get-acl C:\ProgramData\thankQ $inherit =[system.security.accesscontrol.InheritanceFlags]"ContainerInherit,ObjectInherit" $propagation =[system.security.accesscontrol.PropagationFlags]"None" $ace = new-object sys
Image
Install iTunes using SCCM Scripted  Installation of iTunes via SCCM package  iTunes 12.9.3.3 The iTunes one of the difficult application to package and deploy.The below  scripts help you to put all the msi into single rapper script so you could install it in one go. Remember it needs to install on specif order in the power shell script. Make sure you have the msi extracted to shared application folder location in the SCCM server. Install script you may need to save it as .ps1 and other as a bat file. If you install later version of iTunes you might need to install them manually to find all the uninstall strings from the reg key information and update the uninstall script accordingly.  Install script  (Powershell) .................................................................................................................................................................. set working directory     $CurrentLocation = Split-Path -Parent $MyInvocation.MyCommand.Path;
Exchange 2003 to 2010 CAS migration work with public Certificate When you're upgrading your existing Microsoft Exchange Server 2003 organization to Exchange Server 2010, there's a period of time when both Exchange 2003 and Exchange 2010 will coexist within your organization. This topic describes the various steps you must take to upgrade an Exchange 2003 organization to Exchange 2010. After you've ensured that the prerequisites are met and you've obtained the correct certificates, you can begin your upgrade. Do this using the following steps. Note: In the following steps, replace <CAS2010> with the name of your Exchange 2010 Client Access server. Install the Exchange 2010 Client Access server role. During Setup, you can enter the primary external namespace for your virtual directories. This value should be the